在Windows Subsystem for Linux(WSL)下配置OpenGL开发环境和x11转发
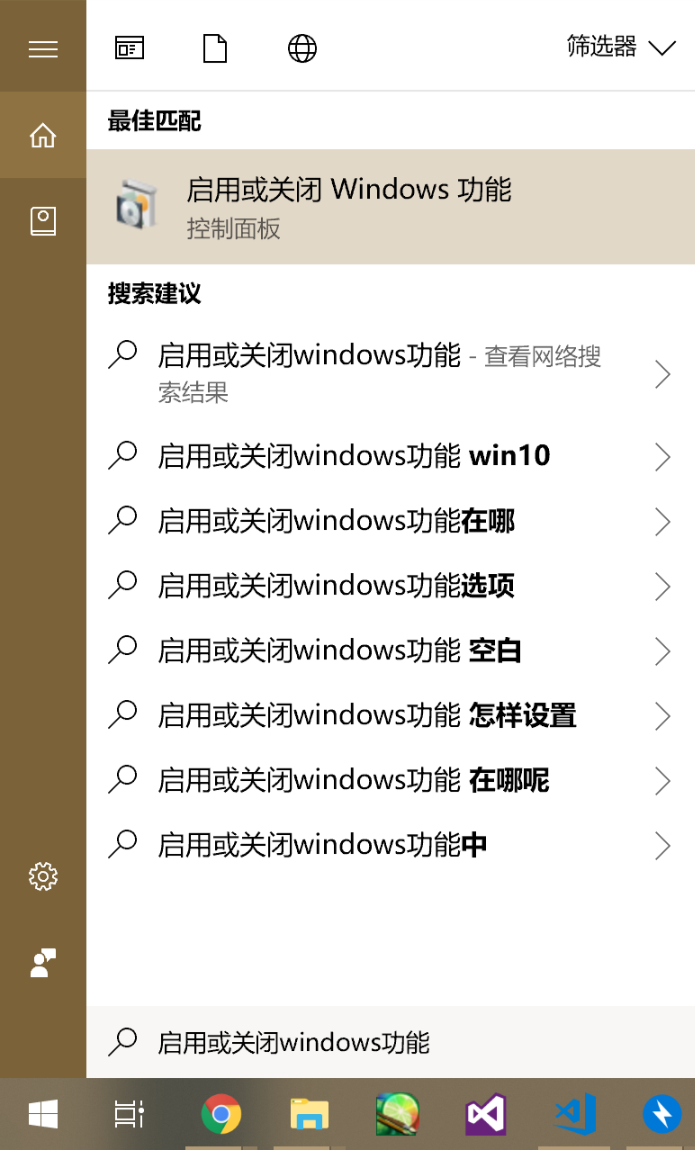
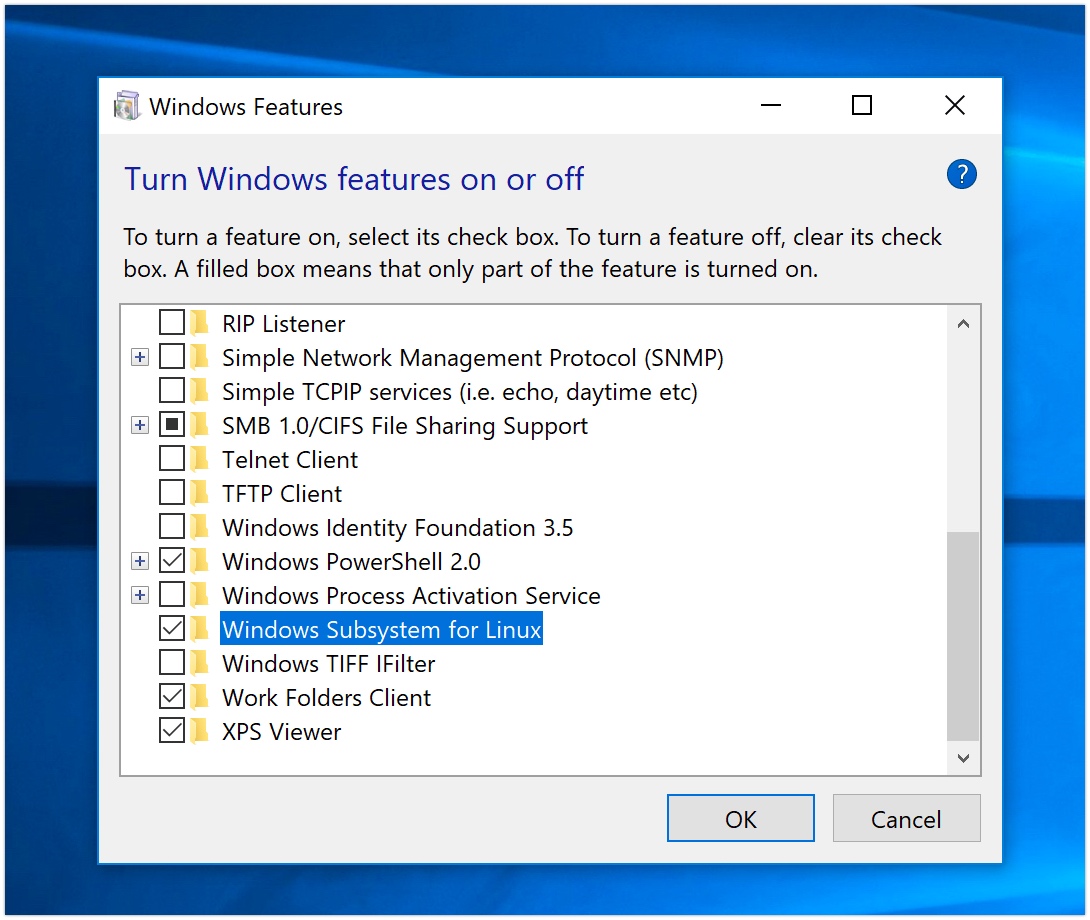
(1)打开启用或关闭windows功能中的Windows Subsystem for Linux
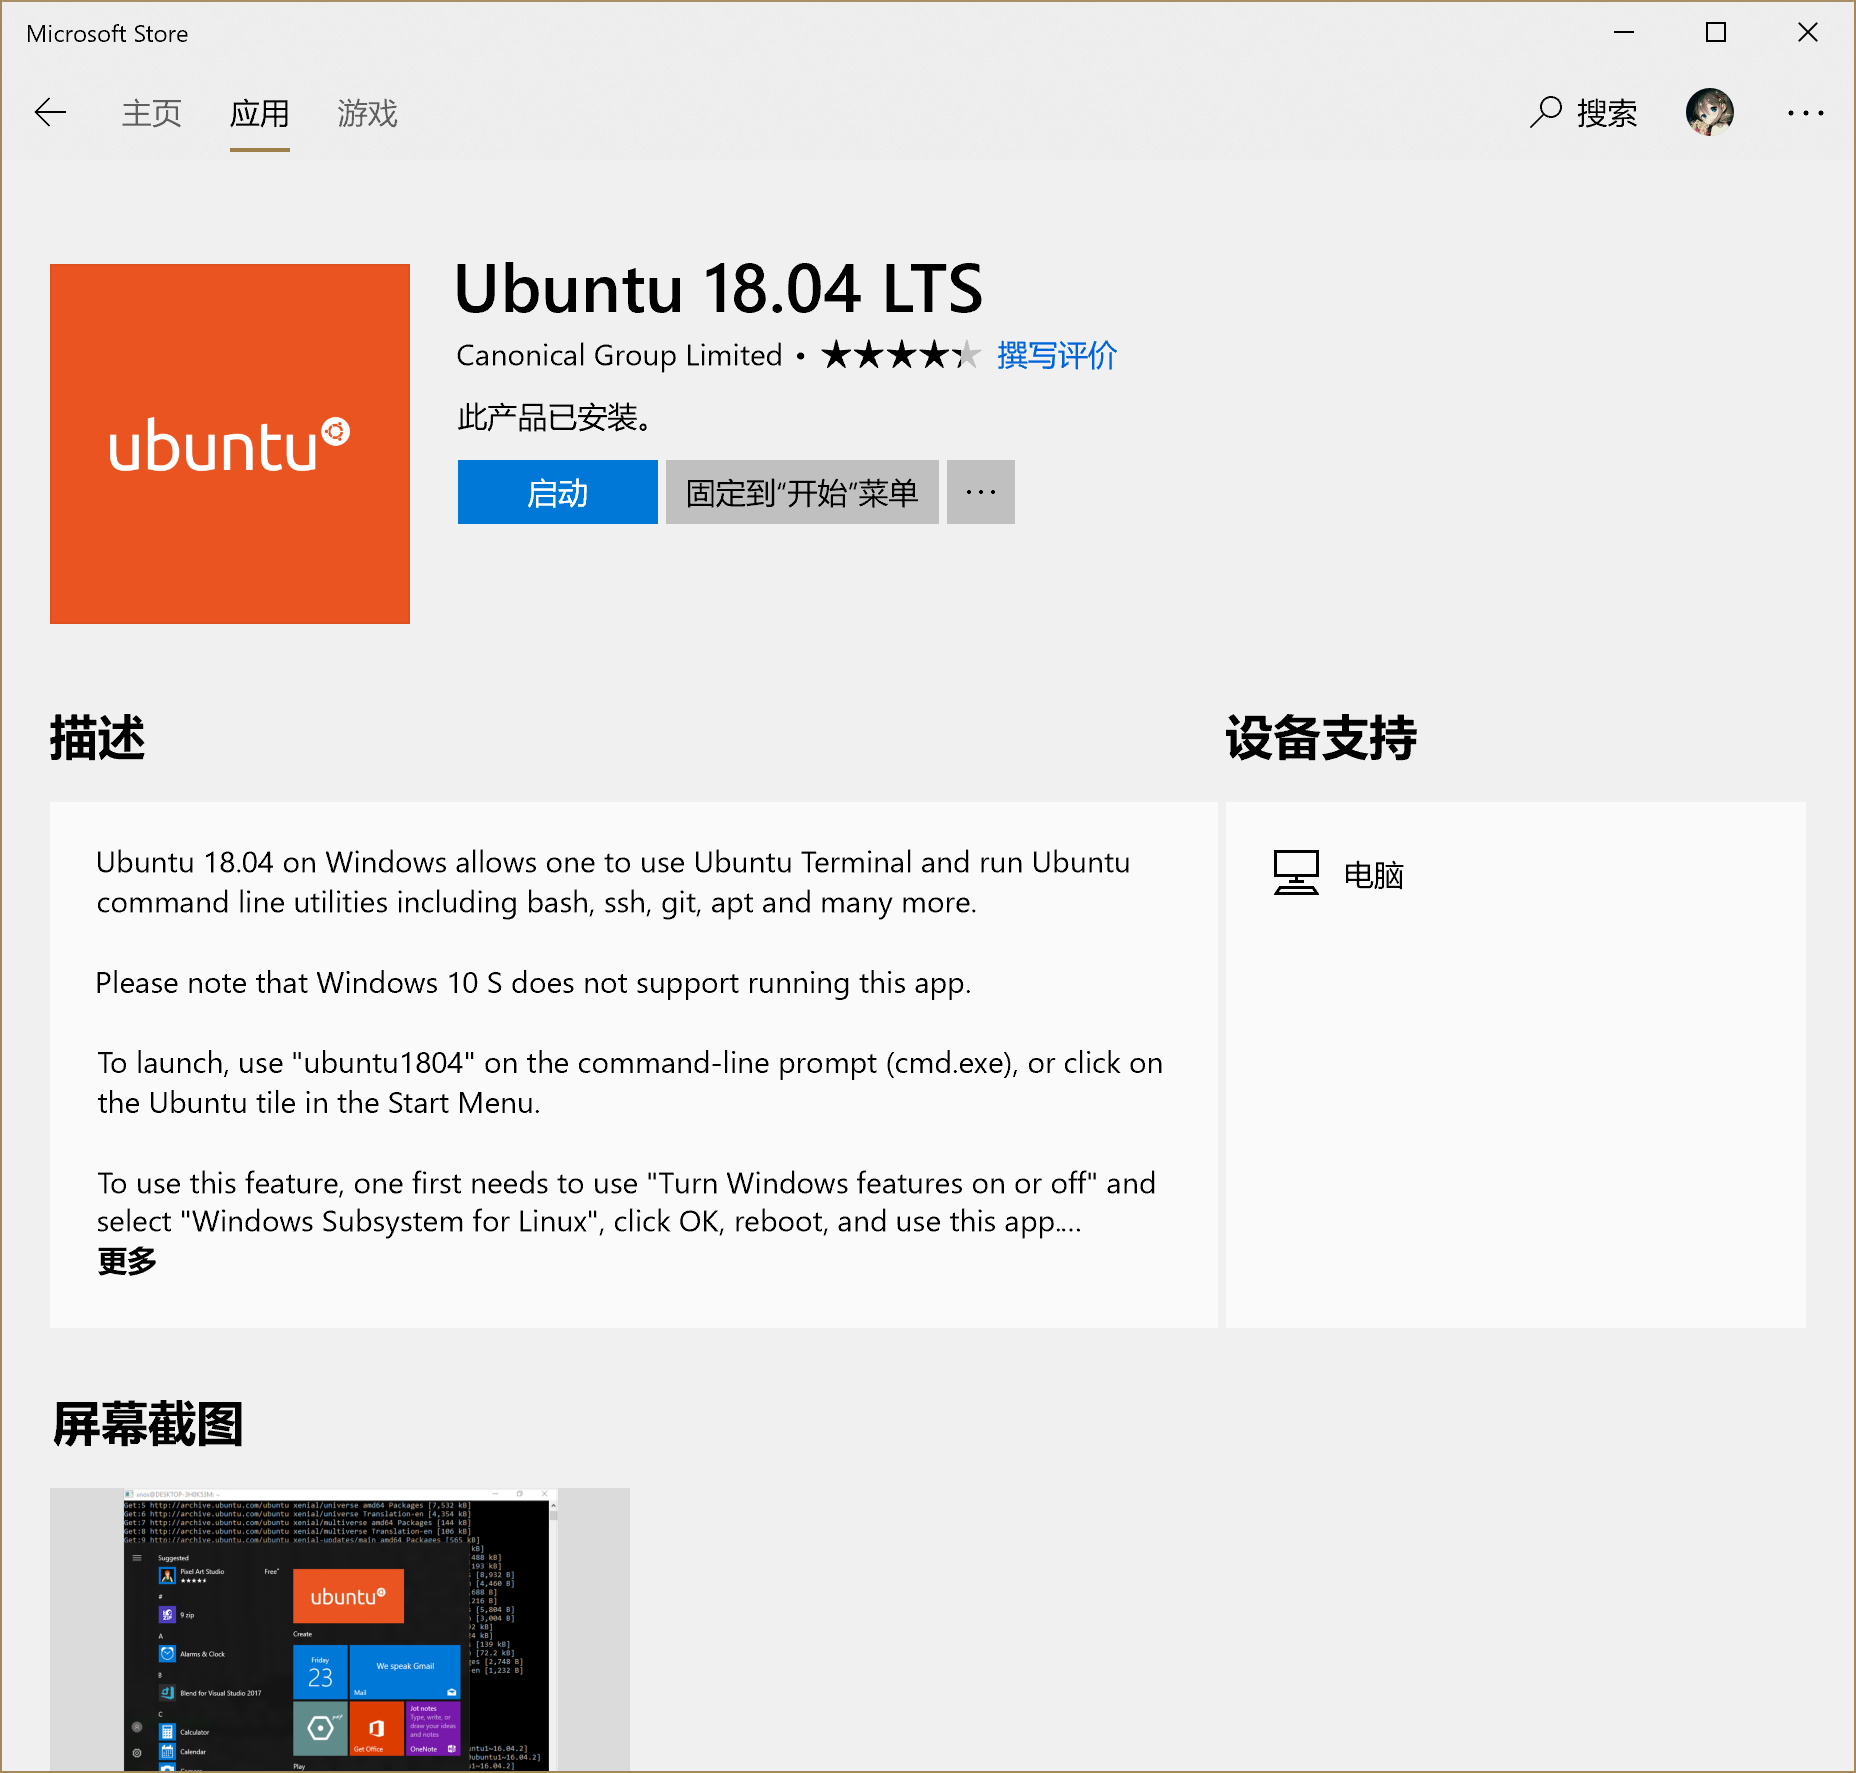
(2)在微软商店中找到ubuntu18并安装
(3)安装完成后启动,等待Ubuntu子系统安装完成,设置用户名密码
(4)设置root密码
sudo passwd root
(5)设置ssh连接
修改sudo vim /etc/ssh/sshd_config至如下(ubuntu的窗口颜色可以右键标题栏修改)
# OpenBSD: sshd_config,v 1.101 2017/03/14 07:19:07 djm Exp
# This is the sshd server system-wide configuration file. See
# sshd_config(5) for more information.
# This sshd was compiled with PATH=/usr/bin:/bin:/usr/sbin:/sbin
# The strategy used for options in the default sshd_config shipped with
# OpenSSH is to specify options with their default value where
# possible, but leave them commented. Uncommented options override the
# default value.
Port 8022
#AddressFamily any
ListenAddress 0.0.0.0
#ListenAddress ::
HostKey /etc/ssh/ssh_host_rsa_key
#HostKey /etc/ssh/ssh_host_ecdsa_key
#HostKey /etc/ssh/ssh_host_ed25519_key
# Ciphers and keying
#RekeyLimit default none
# Logging
#SyslogFacility AUTH
#LogLevel INFO
# Authentication:
AllowUsers azuse
AllowUsers root
#LoginGraceTime 2m
PermitRootLogin yes
#StrictModes yes
#MaxAuthTries 6
#MaxSessions 10
#PubkeyAuthentication no
# Expect .ssh/authorized_keys2 to be disregarded by default in future.
#AuthorizedKeysFile .ssh/authorized_keys .ssh/authorized_keys2
#AuthorizedPrincipalsFile none
#AuthorizedKeysCommand none
#AuthorizedKeysCommandUser nobody
# For this to work you will also need host keys in /etc/ssh/ssh_known_hosts
#HostbasedAuthentication no
# Change to yes if you don't trust ~/.ssh/known_hosts for
# HostbasedAuthentication
#IgnoreUserKnownHosts no
# Don't read the user's ~/.rhosts and ~/.shosts files
#IgnoreRhosts yes
# To disable tunneled clear text passwords, change to no here!
PasswordAuthentication yes
#PermitEmptyPasswords no
# Change to yes to enable challenge-response passwords (beware issues with
# some PAM modules and threads)
ChallengeResponseAuthentication no
# Kerberos options
#KerberosAuthentication no
#KerberosOrLocalPasswd yes
#KerberosTicketCleanup yes
#KerberosGetAFSToken no
# GSSAPI options
#GSSAPIAuthentication no
#GSSAPICleanupCredentials yes
#GSSAPIStrictAcceptorCheck yes
#GSSAPIKeyExchange no
# Set this to 'yes' to enable PAM authentication, account processing,
# and session processing. If this is enabled, PAM authentication will
# be allowed through the ChallengeResponseAuthentication and
# PasswordAuthentication. Depending on your PAM configuration,
# PAM authentication via ChallengeResponseAuthentication may bypass
# the setting of "PermitRootLogin without-password".
# If you just want the PAM account and session checks to run without
# PAM authentication, then enable this but set PasswordAuthentication
# and ChallengeResponseAuthentication to 'no'.
UsePAM no
#AllowAgentForwarding yes
#AllowTcpForwarding yes
#GatewayPorts no
X11Forwarding yes
#X11DisplayOffset 10
#X11UseLocalhost yes
#PermitTTY yes
PrintMotd no
#PrintLastLog yes
#TCPKeepAlive yes
#UseLogin no
#PermitUserEnvironment no
#Compression delayed
#ClientAliveInterval 0
#ClientAliveCountMax 3
#UseDNS no
#PidFile /var/run/sshd.pid
#MaxStartups 10:30:100
#PermitTunnel no
#ChrootDirectory none
#VersionAddendum none
# no default banner path
#Banner none
# Allow client to pass locale environment variables
AcceptEnv LANG LC_*
# override default of no subsystems
Subsystem sftp /usr/lib/openssh/sftp-server
# Example of overriding settings on a per-user basis
#Match User anoncvs
# X11Forwarding no
# AllowTcpForwarding no
# PermitTTY no
# ForceCommand cvs server
然后生成一个sshkey并重启ssh服务
ssh-keygen -f /etc/ssh/ssh_host_rsa_key -N '' -t rsa

sudo service ssh restart
(5)从windows的term连接
选择自己喜欢的终端,我使用的是mobaXterm,设置连接ip为127.0.0.1,端口为8022,用户可以是root也可以是你刚才安装时创建的用户
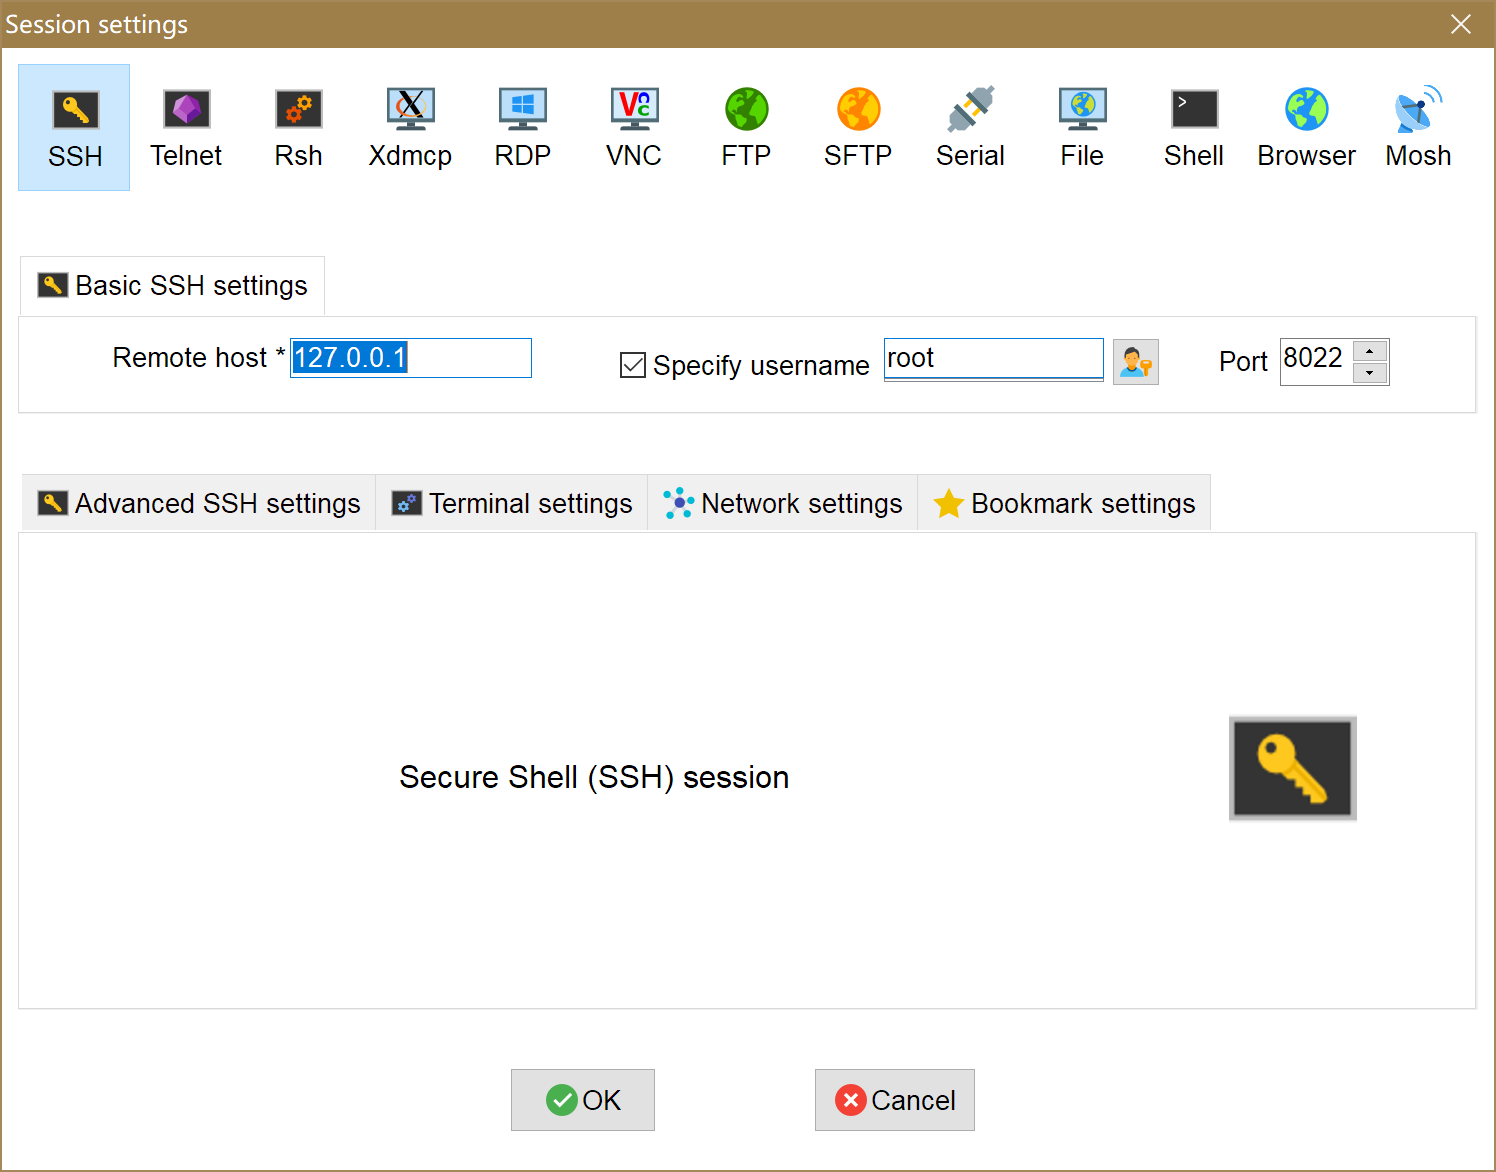
然后连接,现在应该已经可以正常连上主机了
(6)修改ubuntu子系统的apt源
将/etc/apt/sources.list修改为如下
deb http://mirrors.163.com/ubuntu/ bionic main restricted universe multiverse

deb http://mirrors.163.com/ubuntu/ bionic-security main restricted universe multiverse

deb http://mirrors.163.com/ubuntu/ bionic-updates main restricted universe multiverse

deb http://mirrors.163.com/ubuntu/ bionic-proposed main restricted universe multiverse

deb http://mirrors.163.com/ubuntu/ bionic-backports main restricted universe multiverse

deb-src http://mirrors.163.com/ubuntu/ bionic main restricted universe multiverse

deb-src http://mirrors.163.com/ubuntu/ bionic-security main restricted universe multiverse

deb-src http://mirrors.163.com/ubuntu/ bionic-updates main restricted universe multiverse

deb-src http://mirrors.163.com/ubuntu/ bionic-proposed main restricted universe multiverse

deb-src http://mirrors.163.com/ubuntu/ bionic-backports main restricted universe multiverse
(7)安装各种依赖
apt update

apt install libglew-dev

apt install gcc-multilib

apt-get install mesa-utils

apt-get install freeglut3-dev

apt-get install -y build-essential
注:安装liblew-dev的过程可能会出错,有一个deb需要自己安装
    wget http://172.21.0.162/files/316000000002F31A/cdn.packages.deepin.com/deepin/pool/main/libx/libxext/libxext-dev_1.3.3-1_amd64.deb

    dpkg --force-depends -i libxext-dev_1.3.3-1_amd64.deb

    apt --fix-broken install
(8)上传老师的文件,并编译

上传zip文件夹,apt install zip然后unzip firstogl.zip
然后打开firstogl文件夹
apt install cmake -y

cmake .

make
之后在firstogl/bin中应该生成了可执行文件
(9)设置x11转发,显示ubuntu的图形界面
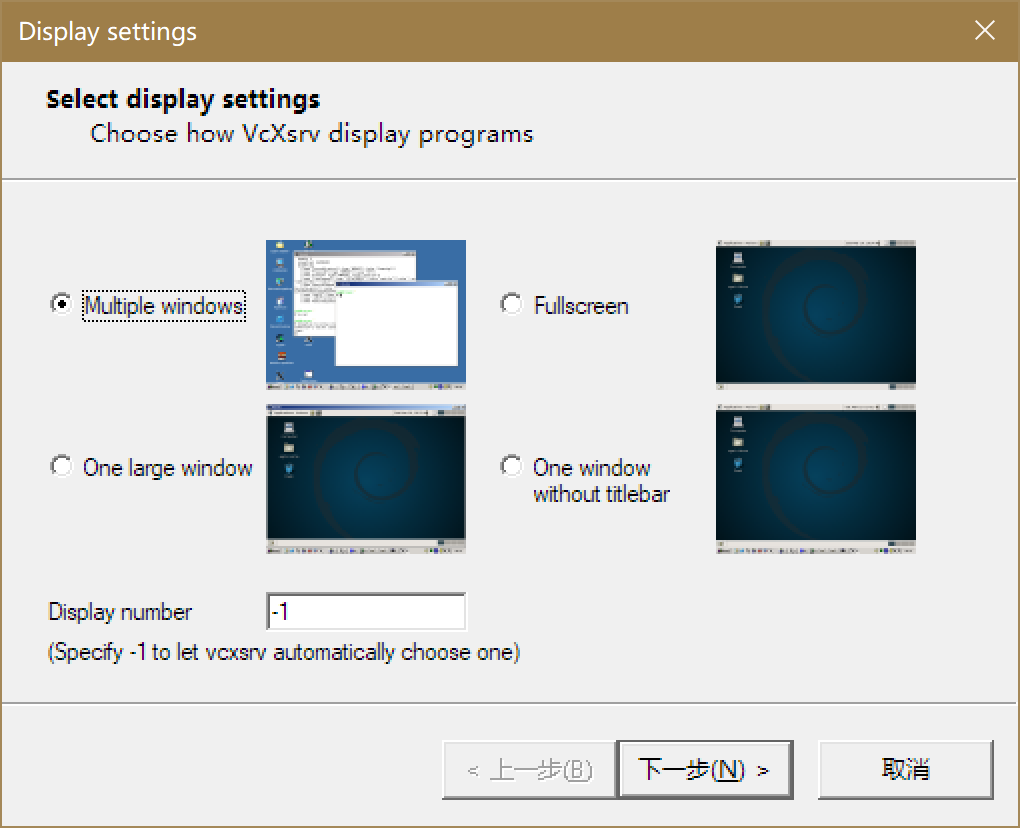
安装VcXsrv并启动Xlaunch
https://sourceforge.net/projects/vcxsrv/files/latest/download
启动时选择Multiple windows
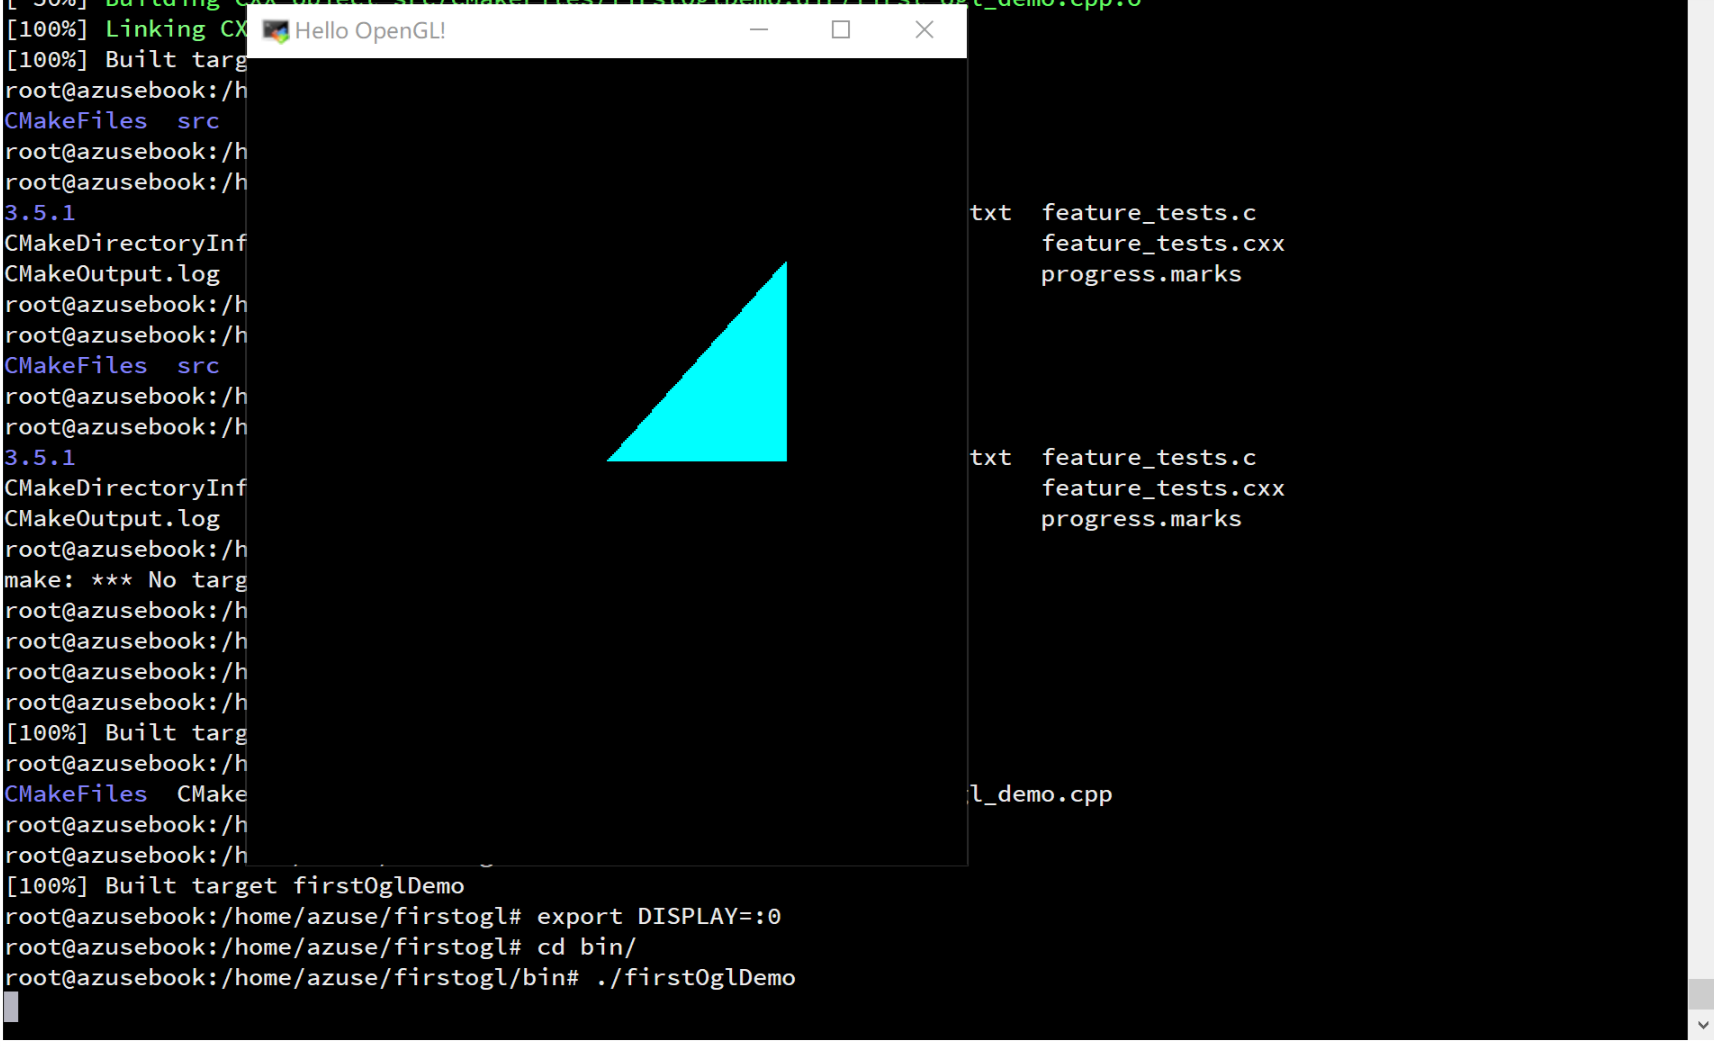
在ubuntu中输入
export DISPLAY=:0
启动编译好的二进制文件
        cd bin/

        ./firstOglDemo
正常运行,如图
2 thoughts to “在Windows Subsystem for Linux(WSL)下配置OpenGL开发环境和x11转发”
博主你好,有测试OpenGL版本是多少吗?
我安装成功后最高只支持1.4版本
抱歉实在是太久以前写的了,当时好像就没注意过OpenGL的版本,大概是就是默认的(捂脸)